Showing posts with label Yoga Steps. Show all posts

Thursday, January 10, 2013

Sun Salutation Step 12


1.  Stand with both feet touching. Bring your hands together, palm to palm, at the heart. Make sure your weight is evenly distributed. Exhale


2. Raise your arms upward. Slowly bend backward, stretching arms above the head. Relax your neck. Inhale.


3. Exhale while you slowly bend forward until your hands are in line with your feet, touching your head to your knees, if possible. Press your palms down, fingertips in line with toes (bend your knees if you have to), and touch the floor.


4. Move your right leg back behind your body in a wide lunge. As you inhale, keep your hands and feet on the ground, with your left foot between your hands, and raise your head.
                                                  

5. Bring your left foot together with your right foot.


6. Exhale as you lower your body, resting on your forearms
7. As you inhale, lower your pelvis to the ground and raise your head and bend backward as far as possible, while straig htening your arms.                                                                            

8. Putting your hand on the ground and keeping your arms straight, raise your hips and align 
your head with your arms. Exhale.
               

9. Slowly inhale and bend your right leg to take a wide forward step. Keeping your hands firmly on the ground, place your right foot between your hands and lift your head up.


10. Keeping your hands in place, bring both feet together. Straighten your legs but keep your waist bent and upper body lowered. Touch your head to your knees, if possible. Exhale.
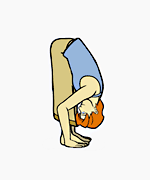

11. Slowly rise, straightening your back into a standing pose. Bend backward, stretching your   arms above your head as you inhale. 


12. Return to position number 1. Exhale.


Sunday, December 30, 2012

Shooting bow posture


Steps :

  1. Sit firmly on the floor and place your legs together releasing them straight out in front of you. While doing thins make sure that your back, shoulders and head is straight.
  2. Once you are comfortably seated in this position, place your palms on your thighs and breathe in deeply.
  3. As you exhale slowly slide your right hand down to the big toe of your right foot and pull the foot towards your face.
  4. At the same time allow the left hand to reach the big toe of the left foot and hold it there.
  5. Inhale deeply and let your right foot reach the right ear.
  6. Stay in this pose for some time.
  7. As you exhale get to your normal position of sitting comfortably.
  8. Repeat this pose again with the other leg.
This pose should be repeated at least twice for both legs in order to receive maximum benefit.

Precautions:

  • Firstly, if you are a beginner do not try the pose when you are alone.
  • This pose belongs to the intermediate level of yoga poses and therefore if you are novice, you should not try this pose at the very outset.
  • You should not perform this asana in case you are pregnant.
  • People with spinal injuries should also avoid this pose.

Beginner’s Tip :

One of the best beginners tips that can be offered when it comes to the shooting bow pose is that if you are having a hard time lifting the thighs away from the floor, you can give yourself a little upward boost by lying down with the thighs being supported by a rolled up blanket.

Benefit to Body Part :

The anatomical focus of the shooting bow pose includes the groins, thighs, chest, belly, spine, shoulders and neck. Some of the benefits of performing this pose include:
  • working and strengthening the legs
  • core muscles build-up
  • the improvement of grace and concentration

Therapeutic Applications :

  • It helps and betters the process of digestion, clears constipation and treats indigestion.
  • It also helps in healing pain in the lower areas of the abdomen and also relieves pain in the larger intestines
  • The pose also helps in regularizing the menstrual cycle in most women.
  • Breathing is greatly enhanced with this pose as it increases the capacity of the lungs to retain oxygen.

Variations :

One of the variations you could switch to when performing the pose is that you use your left hand to pull the right leg to the right ear and vice versa. This could get a little complicated and therefore should be attempted only after you have mastered the actual pose. Your trainer will be able to guide you with different variations.

Saturday, December 29, 2012

Yoga Relaxation Techniques


In yoga, relaxation refers to the loosening of bodily and mental tension. Keeping muscles in a constant alert state expends a great amount of your energy, which then is unavailable when your muscles are called upon to really function.

Conscious relaxation trains your muscles to release their grip when you don’t use them. This relaxation keeps the muscles responsive to the signals from your brain telling them to contract so that you can perform all the countless tasks of a busy day.


Tips for a successful yoga relaxation practice


Relaxation is a conscious endeavor that lies somewhere between effort and noneffort. To truly relax, you have to understand and practice the skill. Try the following:
  • Practice in a quiet environment where you are unlikely to be disturbed by others or the telephone.
  • Try placing a small pillow under your head and a large one under your knees for support and comfort in the supine, or lying, positions.
  • Ensure that your body stays warm. If necessary, heat the room first or cover yourself with a blanket. Particularly avoid lying on a cold floor, which isn’t good for your kidneys.
  • Don’t practice relaxation techniques on a full stomach.

    Deep relaxation in yoga: The corpse posture

    The simplest and yet the most difficult of all yoga postures is the corpse posture, also widely known as the dead pose. The corpse posture is an exercise in mind over matter. The only props you need are your body and mind.
    Here is how you do the corpse pose:
    1. Lie flat on your back, with your arms stretched out and relaxed by your sides, palms up (or whatever feels most comfortable).
      Place a small pillow under your head if you need one and another large pillow under your knees for added comfort.
    2. Close your eyes.
    3. Form a clear intention to relax.
      Some people find it helpful to picture themselves lying in white sand on a sunny beach.
    4. Take a couple of deep breaths, lengthening exhalation.
    5. Contract the muscles in your feet for a couple of seconds and then consciously relax them.
      Do the same with the muscles in your calves, upper legs, buttocks, abdomen, chest, back, hands, forearms, upper arms, shoulders, neck, and face.
    6. Periodically scan all your muscles from your feet to your face to check that they are relaxed.
      You can often detect subtle tension around the eyes and the scalp muscles. Also relax your mouth and tongue.
    7. Focus on the growing bodily sensation of no tension and let your breath be free.
    8. At the end of the session, before opening your eyes, form the intention to keep the relaxed feeling for as long as possible.
    9. Open your eyes, stretch lazily, and get up slowly.

      Practice 10 to 30 minutes; the longer the duration the better.

      Use yoga for relaxation before sleep

      If you want to enjoy deep sleep or are experiencing insomnia (but don’t want to count sheep), the following exercise can help you. Many people don’t make it to the end of this relaxation technique without falling asleep.
      For this exercise, you need the following props: a bed or other comfortable place to sleep, two pillows, and one or two blankets. Allow five to ten minutes. Follow these steps:
      1. Prepare yourself for sleep and get into bed, lying on your back under the blankets.
        Your legs can be straight or bent at the knees with your feet flat on the mattress.
      2. Place one pillow under your head and have the other one close by.
      3. With your eyes closed, begin to breathe through the nose, making your exhalation twice as long as your inhalation.
        Keep your breathing smooth and effortless. Also, don’t try to direct your breath to any part of your body. Let the 1:2 breathing ratio be effortless, something you can keep up.
      4. Remain on your back for eight breaths, then roll over onto your right side and place the second pillow between your knees.
        Now use the same 1:2 ratio for 16 breaths.
      5. Finally, roll over on to your left side, with the second pillow still between your knees, and use the 1:2 ratio for 32 breaths.